The true beauty of an agate isn’t revealed during the tumbling process or the final polish; it happens the very second you open the stone to see what’s inside. Cutting raw rock is both an art and a gamble. You analyze the nodule, decide on an angle, clamp it into the saw, and hope nature has provided a spectacular pattern beneath the surface.
In our latest video, we take you into the workshop for a massive cutting session using our heavy-duty 14-inch and 18-inch saws. We slice into a beautiful variety of materials from around the world to show you exactly how we set up the cuts—and the stunning reveals that come out the other side.
Key Takeaways from Rock Cutting
Working with large lapidary saws takes patience, precision, and an understanding of the rough material. Here is a breakdown of the core techniques we use when processing rough agates.
Analyzing the Rough Stone Before making a cut, you have to read the exterior of the stone. When cutting a nodule, the goal is typically to reveal an unbroken pattern. For example, in the video, a Brazilian Agate is lined up very intentionally. If cut at the wrong angle, the saw would slice across the pattern, creating a disjointed look [00:14]. By cutting parallel to the formation, the final face displays a beautiful, cohesive banding pattern.
You also have to be mindful of imperfections. When placing the rock in the vice, it’s best to angle the cut to avoid slicing directly through any broken edges or external fractures on the rough stone [05:51].
The Importance of Shimming and Clamping When dealing with a massive 18-inch saw blade, security is everything. If a rock slips out of the vice mid-cut, it is a disaster—the blade will almost certainly be damaged or completely ruined [00:27].
Because rocks are naturally uneven and bumpy, you can’t simply clamp them directly into flat vice jaws and expect them to hold. This is why shimming is crucial [07:45]. By wedging small, angled pieces of wood (like 15-degree shims) between the uneven rock and the clamp, you create a perfectly tight, secure grip. The blade cuts right through the wooden shims without taking any damage.
Squaring the Face If a rock is loaded into the saw incorrectly, it can cause the blade to wander. The stone must sit perfectly square against the blade [04:20]. A great way to test this before turning on the machine is to loosen the rock, slide it gently against the idle blade, and manually tighten it so the face lines up flush [13:03]. This ensures a straight, clean cut that doesn’t put sideways pressure on the equipment.
The Big Reveals
Cutting is always a gamble. Sometimes you hope for a show-stopper and get a solid quartz center, and other times, an unassuming rough rock yields a museum-quality face. Here are some of the spectacular materials revealed in this cutting session:
- India Banded Agate: The very first cut yielded a beautiful banded pattern complete with a “shadow” effect [03:17].
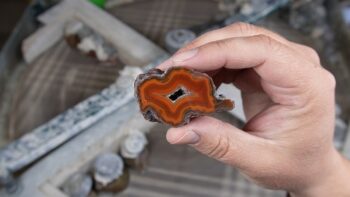
- Dugway Geode (Utah): A nostalgic favorite that opened perfectly to reveal beautiful agate patterns circling a hollow geode center [10:39].
- Australian Dendritic Opal: Sliced on the 18-inch saw to prevent the delicate material from breaking by hand. It yielded a flawless, crack-free face that is a dream to polish [18:23].
- Moroccan Seam Agate: To get a good specimen out of seam agate, you have to slice it horizontally (like a hamburger bun). This difficult cut paid off with gorgeous, flame-like orange and yellow banding [22:38].
- Crazy Lace Agate (Mexico): The day wrapped up with a spectacular piece of Crazy Lace, boasting bright colors and a beautiful V-shaped pattern [30:01].
Every rock is a mystery until it hits the saw. If you’re looking for beautiful pre-cut slabs to start polishing yourself, check out our selection of lapidary materials in the shop!
 CRA161
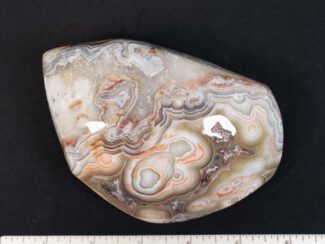 Crazy Lace Agate Specimen
 SPHERE177
 CRA138
 SPHERE174
 SPHERE175
 SPHERE191
 PYRITE112
 CROW107